
Where creativity meets new inspiration …
Hold a few notes and Arpeggiator MK1 weaves them into patterns — single-note runs, harmonised arpeggios, or chord-driven sequences across up to 32 steps. Per-step control over pitch, gate, velocity and chord shape gives you depth; multi-step editing keeps it fast. Sync to your DAW and play.
Arpeggiator MK1 — User Guide
Version 1.0 • VST3 instrument plugin
Table of Contents
Overview
Installation
Quick Start
Global Controls
Per-Step Controls
The On-Screen Piano
DAW Handling of Presets
Tips and Common Patterns
Quick Reference
1. Overview
Arpeggiator MK1 is a MIDI step-sequencing arpeggiator: it takes the notes you hold (or latch) and turns them into a rhythmic pattern of single notes, chords, or harmonised arpeggios. It runs as a VST3 instrument plugin and produces MIDI output, which you route to any synthesizer in your DAW.
It is built around a 32-step pattern with per-step control over pitch, velocity, gate length, octave spread, and chord shape. A pattern can run in host-sync mode (locked to the DAW's transport and tempo) or in internal mode (using its own BPM clock). When held notes drive the pattern, the order in which they're walked through is configurable: ascending, descending, bouncing, played-order, or random.
The plugin is conceptually a few connected pieces:
Held-notes set — the live pool of notes the arpeggiator currently considers. Filled by your MIDI keyboard, MIDI clips on the track, and the on-screen piano (with optional latch).
Clock — drives time. Either follows the host's transport or runs at its own BPM.
Pattern — a repeating sequence of 1 to 32 steps. Each step has its own pitch, gate, length, etc.
Note picker — for each firing step, decides which note(s) to emit, based on the held-notes set and that step's parameters.
MIDI emit — writes the resulting note-on / note-off events to the plugin's MIDI output.
The rest of this guide walks the controls in two stages: global controls along the top row of the window, then per-step controls in the grid below. A short final section covers DAW-specific notes for saving and recalling presets.
2. Installation
Arpeggiator MK1 is distributed as a download containing the plugin files for your platform. There is no installer — you simply copy the files to the correct folder for your DAW to find them.
2.1 Windows
The download contains:
Arpeggiator MK1.vst3 — the VST3 plugin bundle (technically a folder, but Windows treats it as a single item).
Where to copy it:
Copy Arpeggiator MK1.vst3 to:
C:\Program Files\Common Files\VST3\
This is the standard location for VST3 plugins on Windows. Every modern DAW scans it automatically. You may need administrator permission to write to this folder — confirm the UAC prompt if Windows asks.
After copying, restart your DAW. The plugin will appear in the instrument browser under "Matzen Digital".
2.2 macOS
The download contains:
Arpeggiator MK1.vst3 — VST3 plugin bundle for VST3-capable DAWs (Cubase, Nuendo, Studio One, Reaper, Ableton Live, etc.).
Arpeggiator MK1.component — Audio Unit (AU) plugin bundle for Logic Pro, GarageBand, MainStage, and other AU-only hosts.
Where to copy them:
Copy Arpeggiator MK1.vst3 to:
/Library/Audio/Plug-Ins/VST3/
Copy Arpeggiator MK1.component to:
/Library/Audio/Plug-Ins/Components/
These are the system-wide plugin folders. You'll be prompted for your administrator password when copying. You can also install per-user (in ~/Library/Audio/Plug-Ins/... instead of /Library/...) if you prefer not to install system-wide — most DAWs scan both locations.
After copying, restart your DAW. Logic Pro will run an AU validation scan on the new component; this is normal and takes a few seconds.
Important: bypassing macOS Gatekeeper on first launch
Because Arpeggiator MK1 is distributed directly from our website (not through the Mac App Store), macOS treats the downloaded files as untrusted and will block them the first time your DAW tries to load them. You will likely see either:
A warning dialog: "Arpeggiator MK1 cannot be opened because the developer cannot be verified", or
The plugin simply doesn't appear in your DAW's plugin browser, or
Logic Pro's AU validation fails with an error.
This is a one-time issue per plugin file. You need to tell macOS that you trust the file. There are two ways to do this; use whichever you're more comfortable with.
Method 1 — Right-click and "Open" (recommended for most users)
Open Finder and navigate to where you copied the plugin file, e.g. /Library/Audio/Plug-Ins/VST3/.
Right-click (or Control-click) on Arpeggiator MK1.vst3.
Choose Open from the menu.
macOS will display a security warning. Click Open in that dialog.
The plugin is now whitelisted. Repeat for Arpeggiator MK1.component if you also copied that file.
Restart your DAW. The plugin should now load.
On newer macOS versions (Ventura, Sonoma, Sequoia), you may instead see a "<file> was blocked to protect your Mac" message. In that case:
Open System Settings → Privacy & Security.
Scroll down to the Security section.
You'll see "Arpeggiator MK1.vst3 was blocked..." with an Open Anyway button.
Click Open Anyway and confirm with your password.
Restart your DAW.
Method 2 — Terminal command (one line, fastest if you're comfortable with Terminal)
This removes the "quarantine" attribute macOS attached to the downloaded file, in one shot:
Open the Terminal application (Applications → Utilities → Terminal).
Type the following command (or copy/paste it), then press Enter:
sudo xattr -dr com.apple.quarantine /Library/Audio/Plug-Ins/VST3/Arpeggiator\ MK1.vst3 /Library/Audio/Plug-Ins/Components/Arpeggiator\ MK1.component
Enter your administrator password when prompted (you won't see the password as you type — that's normal).
The command runs silently and returns to the prompt when done.
Restart your DAW.
If you only installed one of the two files, just remove the path you didn't install. For per-user installs, replace /Library/... with ~/Library/... (without the sudo).
Verifying it worked
After restarting your DAW, the plugin should appear in the plugin browser under "Matzen Digital" without warnings. If it still doesn't appear:
Make sure you copied the file to the correct location (Section 2.2 above).
For VST3: confirm your DAW supports VST3 (most modern Mac DAWs do, but not all).
For Logic Pro: open Audio MIDI Setup → Audio Devices and force an AU re-scan, or simply quit and relaunch Logic.
This is a one-time setup. Once you've bypassed Gatekeeper for a plugin file, future launches load it without any further prompts. When a new version of the plugin is released, you'll need to repeat this process for the new file.
2.3 Uninstalling
To remove the plugin, simply delete the file(s) from the locations above and restart your DAW.
2.4 Updates
Future versions of the plugin replace the existing files. Quit your DAW, delete the existing plugin file(s), copy the new files to the same location, and restart your DAW. Your saved presets and project state remain compatible across plugin versions.
3. Quick Start
Five steps to get sound out of the plugin in any DAW:
Add the plugin to a MIDI track in your DAW.
Route its MIDI output to a synthesizer (the routing method depends on your DAW — see Section 7).
Open the plugin window. Make sure RUN is on (the indicator above the RUN label should be lit amber).
Either play and hold a chord on your MIDI keyboard, or click notes on the on-screen piano with LATCH on (the latched notes stay held).
Press play in the DAW transport. The arpeggiator should now drive the synth.
If nothing plays, check that SYNC is on (so the plugin follows the DAW transport), that you actually have notes held or latched (the held-notes set is what the arpeggiator walks through), and that the DAW's MIDI routing is correct.
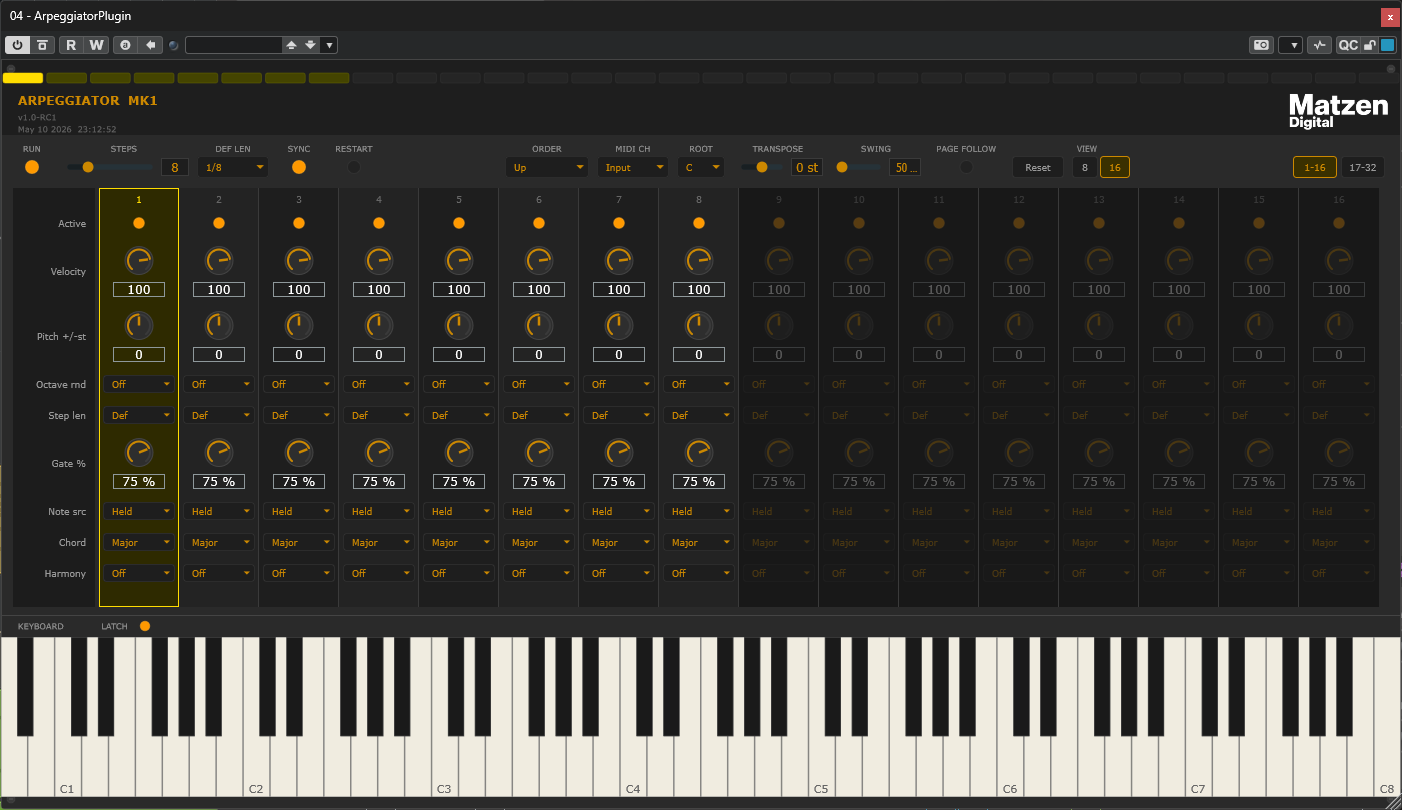
4. Global Controls
The top row contains the controls that affect the whole pattern. They're presented in roughly the order you'd reach for them — from "is the engine running?" on the left to view options on the right.
4.1 RUN
Master on/off for the engine. When off, the plugin silences any sounding notes and produces no MIDI output. Held-note tracking continues internally so the engine knows what's pressed when it resumes. Re-entry is treated as a fresh start: if RESTART is on, the pattern returns to step 1 on resumption; otherwise the pattern phase-locks to song position and resumes seamlessly.
Use it as a quick mute for the arpeggiator without disturbing the rest of your project.
4.2 STEPS
Sets how many steps in the pattern are active, from 1 to 32. The slider value is reflected in the step indicator bar at the very top of the window: lit-amber cells are active, dim cells are out of range.
The grid columns themselves stay fully visible and editable regardless of STEPS — you can adjust velocity, pitch, gate, and every other per-step parameter on steps beyond the active count. Those edits are preserved but won't be heard until you increase STEPS to include them. This is intentional: it lets you prepare a 32-step pattern in advance, then dial STEPS down to test shorter versions, then bring it back up without losing anything. Use the step indicator bar at the top of the window as your reference for which steps are currently playing.
4.3 DEF LEN (Default Step Length)
The length each step takes when its per-step Length is set to "Def". Choices: 1/1, 1/2, 1/4, 1/8, 1/16, 1/32, plus triplet variants (1/1T, 1/2T, etc.). 1/8 is the default.
Most users set this once for a pattern and only override individual step lengths when they want syncopation or rhythmic variety. The per-step length dropdown (covered in Section 5.4) inherits this value when set to "Def".
4.4 SYNC
Switches between two clock modes:
Host (on) — the plugin follows the DAW's transport and uses the DAW's BPM. Step lengths are absolute musical durations (1/8 means a real 1/8 note at the host's tempo). The arpeggiator only emits when the DAW transport is rolling.
Internal (off) — the plugin uses its own clock at the BPM you set on the BPM slider. The DAW transport is irrelevant; the arpeggiator emits whenever notes are held, even with the DAW stopped.
Internal mode is useful for free-tempo experimentation, for live performance setups where you don't want the host transport involved, or for patches you want to play in the plugin's own browser without configuring DAW playback.
4.5 RESTART
Only meaningful in host-sync mode. Controls how the pattern aligns to the host's transport on play.
On — the pattern always restarts at step 1 when the DAW transport begins, and again whenever you return notes to the held set after a silence. Predictable phrase starts, useful for patterns that have a clear "bar one" feel.
Off — the pattern phase-locks to song position, so it sounds the same regardless of when you press play within the bar. Useful for ambient or evolving patterns where you want continuity rather than a fresh take every time.
4.6 BPM
Sets the internal clock tempo, used only when SYNC is off. Range 30 to 300 BPM in 0.1 BPM increments. Default 120.
In host-sync mode the slider is dimmed and ignored — the host's BPM is used instead. The label updates to clarify which clock is in effect.
4.7 ORDER
How the engine walks the held-notes set when steps fire.
Up — ascending pitch, low to high, then wrap.
Down — descending pitch, high to low, then wrap.
Up/Down — ascending then descending, bouncing off both ends.
Played — the order in which you pressed the notes (insertion order).
Random — fresh random pick each step.
Order applies only when steps use the "Held" note source (Section 5.7). Steps in "Chord" mode pick their notes from the chord intervals instead, ignoring this setting.
4.8 MIDI CH
MIDI channel for emitted notes.
Input (default) — output channel matches the channel of the incoming note that put it into the held set. Useful for chained MIDI workflows where you want the arpeggiator to be channel-transparent.
1 to 16 — every emitted MIDI message is forced to this channel, regardless of the input channel.
4.9 ROOT
Root note for steps in "Chord" mode. The chord's intervals (defined per step in Section 5.8) are added to this root. Choose from C through B.
Steps in "Held" mode ignore this — they play notes from the held-notes set, transposed only by per-step pitch offset and global transpose.
4.10 TRANSPOSE
Global pitch offset in semitones, range -24 to +24. Applied to every emitted note as the last step in the pitch calculation, after per-step pitch offset and octave spread, after the chord interval (in Chord mode) or held-note pickup (in Held mode), and before the result is clamped to 0–127.
Useful for moving an entire pattern up or down without editing individual steps.
4.11 SWING
Distributes time within step pairs to create groove. Range 50% (no swing) to 75% (strong shuffle).
50 — straight, even-length steps.
67 — moderate triplet feel; even-indexed steps take 2/3 of the pair time, odd-indexed steps take 1/3.
75 — strong shuffle.
Even-indexed steps (1, 3, 5...) take the longer share. Swing affects the sample-domain step length only; the underlying pattern beat math stays grid-aligned regardless of swing percentage.
4.12 PAGE FOLLOW
When on, the visible page of the grid auto-scrolls to follow the playing step. Useful for monitoring long patterns at 8-step view.
Caveat: a page change while you're editing a slider's text-box will cancel the in-progress edit (the text editor component is destroyed when the page swaps). Turn PAGE FOLLOW off temporarily if you're doing precise number entry.
4.13 Reset
Restores all step parameters and most globals to their defaults, in one action. Specifically, Reset:
Clears all latched notes (sends MIDI note-offs and clears them from the on-screen piano).
Silences any sounding notes properly (with note-off messages, not abrupt cutoff).
Sets all 32 steps to default values: active, velocity 100, no pitch offset, length "Def", gate 75%, no octave spread, note source "Held", chord type Major, harmony off.
Sets STEPS to 8 and most globals to their defaults: DEF LEN 1/8, ORDER Up, MIDI CH Input, ROOT C, TRANSPOSE 0, SWING 50, BPM 120, RESTART off.
Switches the view to page 1 / 16-step view.
Clears any multi-step selection.
Reset does NOT touch RUN or SYNC — these are session controls you've set deliberately, so flipping them automatically would be surprising. PAGE FOLLOW is also preserved.
4.14 View 8 / 16
Toggles between 8 and 16 visible steps per page. Page buttons (next to the View buttons) navigate between pages: at 8-step view there are 4 pages covering steps 1-8, 9-16, 17-24, 25-32; at 16-step view there are 2 pages covering steps 1-16 and 17-32.
8-step view gives larger knobs and more breathing room; 16-step view shows half the pattern at once. For most workflows, 16-step view is the more useful default.
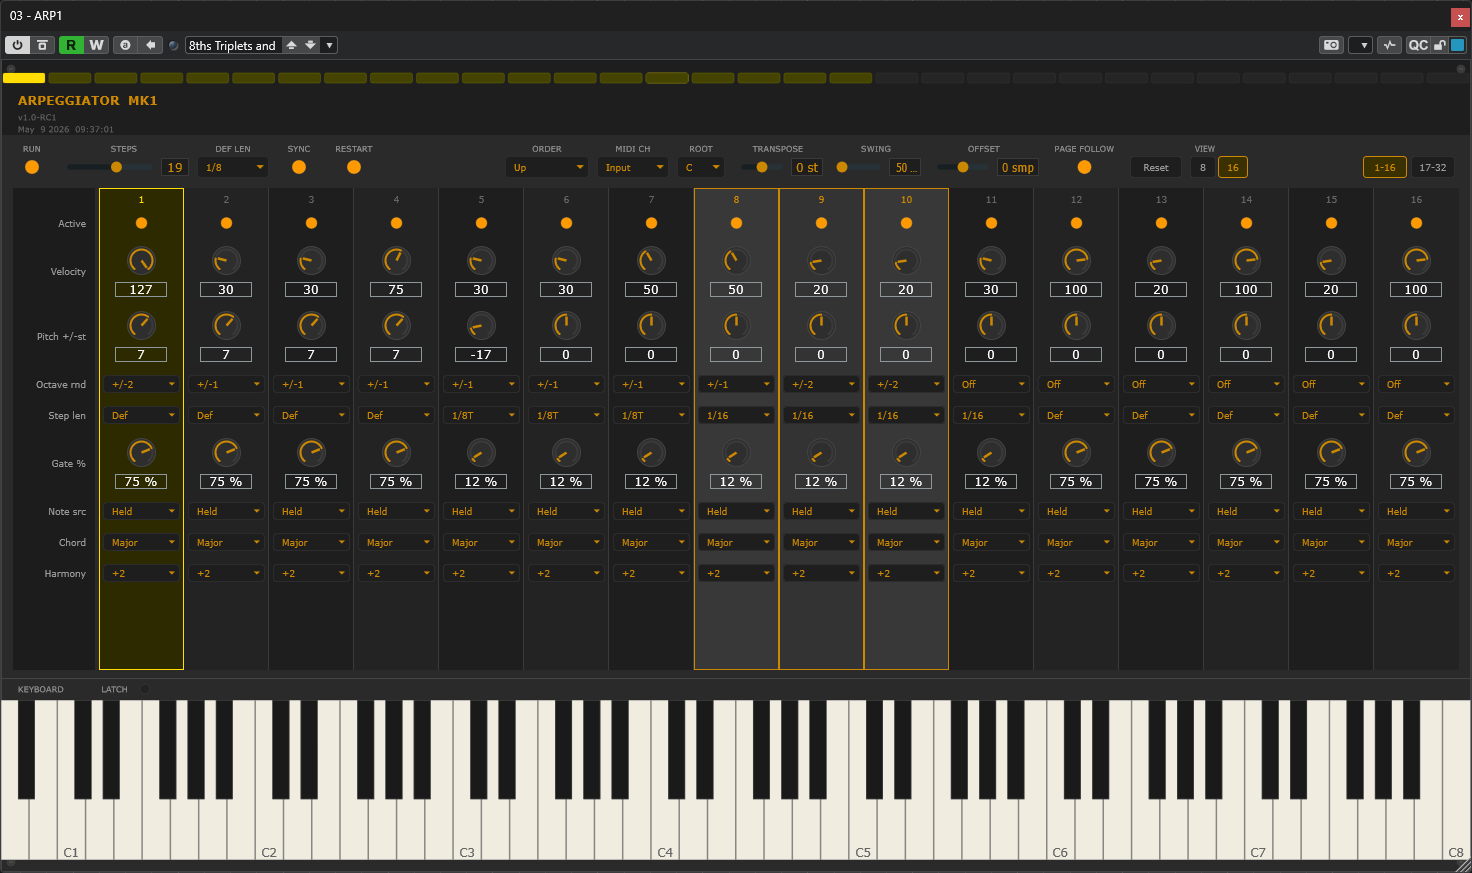
5. Per-Step Controls
Each step in the pattern has nine controls, arranged in a column from top to bottom. The leftmost column shows the row labels: Active, Velocity, Pitch +/-st, Octave rnd, Step len, Gate %, Note src, Chord, Harmony.
Selecting steps
Click on a step's number (the digit at the very top of its column) to select that step. Selection is shown by a lighter alternating-grey column background and a soft amber border.
Click — selects only that step (or deselects, if it was the only step selected).
Shift-click — extends the selection from the last-clicked step to the just-clicked step (range select).
Ctrl-click — toggles individual step in/out of the selection.
Multi-step editing
When two or more steps are selected, changing any per-step control on a selected step automatically applies the same change to every other selected step. There's no modifier key — selection itself enables the broadcast.
This works for sliders (continuously during the drag — you'll see and hear all selected knobs move together in real time), toggles, and dropdowns. Editing a control on a step that's NOT in the current selection has no effect on other steps; only the directly-edited step changes.
Tip: select 8 steps, set velocity to 100 on one of them, all 8 take that value. Then select just steps 1, 3, 5, 7 and lower their gate — only those four change.
5.1 Active
Toggles whether the step fires at all. Off = silent rest (the pattern still advances through the step, just emits nothing). Useful for creating rests and rhythmic gaps.
5.2 Velocity
MIDI velocity for emitted notes, 0 to 127. The actual audio response depends on the receiving synth — most velocity-sensitive synths produce louder, brighter notes at higher values.
5.3 Pitch +/-st
Per-step pitch offset in semitones, -24 to +24. Applied on top of the held note (in Held mode) or chord interval (in Chord mode). Combined with global TRANSPOSE — they add.
Use it for melodic ornamentation: hold a single note, then put +12 on step 4 and +7 on step 6 to weave a simple pattern around the root.
5.4 Step len
Per-step length, overriding the global DEF LEN. Choices: "Def" (use DEF LEN), 1/1, 1/2, 1/4, 1/8, 1/16, 1/32, and triplets 1/1T through 1/32T.
Mixing step lengths is the cleanest way to create non-uniform rhythms in a pattern. Default is "Def" so the global DEF LEN takes effect; only override on steps where you want a different duration.
5.5 Gate %
How long the note rings within the step's allocated time, as a percentage. 5% to 100%, default 75%.
100% — legato; note-off fires exactly at the next step boundary (which is when the next note-on fires).
50% — staccato; note rings for the first half of the step, then silence.
5–25% — very short; useful for percussive synth patches or to leave space for the next note.
5.6 Octave rnd (Octave Spread)
Random octave shift applied each time the step fires.
Off — no shift.
+/-1 — randomly -12, 0, or +12 semitones.
+/-2 — randomly -24, -12, 0, +12, or +24 semitones.
The randomization happens fresh on every fire of the step, so successive cycles of the pattern produce different octave choices. Used sparingly, it adds organic variation; used heavily, it produces ambient/glitchy textures.
5.7 Note src (Note Source)
Decides where this step gets its base pitch.
Held — the note comes from the current held-notes set, picked according to the global ORDER. This is standard arpeggiator behaviour and the default for every step.
Chord — the note is a randomly-picked interval from the per-step Chord type, added to the global ROOT. Held notes are ignored for this step. Useful for steps that should always play a fixed harmonic pitch regardless of what you're holding.
5.8 Chord
Chord shape used by this step when Note src is set to "Chord". Each cycle of the pattern picks a random interval from the chord's interval list. Available shapes:
Chord Intervals (semitones)
Major - 0, 4, 7
Minor - 0, 3, 7
Dom 7 - 0, 4, 7, 10
Maj 7 - 0, 4, 7, 11
Min 7- 0, 3, 7, 10
Sus 2 - 0, 2, 7
Sus 4 - 0, 5, 7
Dim - 0, 3, 6
Aug - 0, 4, 8
Maj 6 - 0, 4, 7, 9
Min 6 - 0, 3, 7, 9
In Held mode this dropdown is harmless but inactive; the step's note picking ignores chord settings entirely.
5.9 Harmony
Optional extra simultaneous notes drawn from the held-notes set. Active only in Held mode.
Off — only the primary note plays (standard behaviour).
+1 — randomly play 0 or 1 additional held note alongside the primary.
+2 — randomly play 0, 1, or 2 additional held notes.
The harmony notes are picked from the held set excluding the current primary note, so they always add new pitches rather than doubling. Use this to turn a single-note arpeggio into a chordal pattern, or to add unpredictable color to busy patterns.
6. The On-Screen Piano
Below the grid is a full 88-key piano keyboard. It serves three purposes:
Provides a way to feed notes into the arpeggiator without an external MIDI keyboard.
Gives a visual reference of which notes are currently held — held keys (whether from a MIDI keyboard, a clip, or the on-screen piano itself) are tinted amber.
With LATCH on, lets you click notes that stay held even after the mouse releases — the standard way to set up a chord and let the arpeggiator run on it indefinitely.
6.1 LATCH
Toggle above the piano. When on, clicking a key adds it to the latched set; clicking it again removes it. Latched notes survive mouse-up. When LATCH is off, clicked notes follow normal mouse-down/mouse-up semantics.
LATCH is the typical workflow: latch a chord, then leave the arpeggiator running while you tweak parameters or work on other tracks. Live MIDI input is independent — whether or not LATCH is on, your MIDI keyboard always feeds notes into the held set in real time.
6.2 Scrolling and clicking
The piano shows all 88 keys at any window width. Scroll the mouse wheel over the piano to scroll the visible region (not strictly necessary at minimum window width — 88 keys fit, just very compact). Click and drag horizontally on a key to play through neighboring keys.
7. DAW Handling of Presets
The plugin stores its complete state — every parameter, every step's settings, and the editor window size — through the standard VST3 preset mechanism. Three things to know:
7.1 What's saved
All global parameters (STEPS, DEF LEN, SYNC, RESTART, BPM, ORDER, MIDI CH, ROOT, TRANSPOSE, SWING, PAGE FOLLOW, RUN).
All per-step parameters for all 32 steps, regardless of how many are currently active. Steps beyond STEPS retain their settings.
Editor window dimensions, so the plugin opens at the size you last left it.
7.2 What's NOT saved
Latched piano notes. Latched state lives only for the current session; it doesn't persist across project save/load. Re-latch your starting chord on each session.
Multi-step selection. The selection state is editor-side and resets to empty on every load.
Page Follow toggle and 8/16 view. These are session preferences, not part of the preset state.
7.3 Steinberg Nuendo / Cubase
Use the standard plugin preset menu in the plugin window's title bar (the small dropdown button near the top, often showing the current preset name).
Save preset — "Save Preset..." creates a .vstpreset file in your user preset folder for the plugin (typically %APPDATA%\VST3 Presets\<vendor>\Arpeggiator MK1\).
Load preset — the same dropdown lists all saved presets; select to load.
Project state — separately, every project save records the current state of all plugin instances. Loading the project restores them exactly. You don't need to save a preset to keep your settings in a project.
7.4 Other VST3 hosts
Behaviour is similar across hosts. Reaper uses its own .RfxChain or .vstpreset format; Studio One has its own preset browser. The mechanics of saving and loading vary by host but the underlying state is the same — every host hands the plugin the same XML state to write or read.
If a preset saved in one DAW doesn't load in another, that's almost always a host-side difference in how the .vstpreset file is wrapped, not a plugin issue.
7.5 Migrating from older versions
Presets and project state from earlier RC builds load cleanly into RC1. The earlier OFFSET parameter (removed in RC1) is silently ignored on load — old presets just don't carry an offset value.
If you have an older project where the plugin window opens at an unusual size, drag the window edge once to refresh the layout, then save the project. This stores the new dimensions and the issue won't recur.
8. Tips and Common Patterns
8.1 Holding a chord across the entire arrangement
Use LATCH on the on-screen piano. Click your chord's notes once to latch them, then go work on other tracks — the arpeggiator keeps running on the latched notes until you click them off or hit Reset.
8.2 Synth preset switching
If you change synth presets on the receiving instrument while the arpeggiator is running, you may occasionally hear a hung note. This is the receiving synth not handling note-offs cleanly during a program change — it's not the arpeggiator. Best practice: pause RUN, switch presets, re-engage RUN.
8.3 Building polyrhythmic patterns
Mix step lengths within one pattern. Set STEPS to 8 and DEF LEN to 1/8, then override step 4 to 1/4 and step 8 to 1/4. The pattern is no longer 8 eighth-notes; it's six eighths plus two quarters, totaling 10 eighth-note durations of musical time. Combined with held chords, this creates patterns that drift in and out of phase with the metronome.
8.4 Chord-mode for fixed bass lines
Set steps 1, 5, 9, 13 to Note src = Chord, with a Major chord shape; leave the others as Held. The chord-mode steps now play a fixed-pitch bass line rooted at ROOT, while the others arpeggiate whatever you're holding. Switching ROOT (or automating it) changes the bass line without disturbing the arpeggio.
8.5 Multi-step quick edits
Need to set the same value on every step? Click step 1 to select, then Shift-click step 32 to select all. Now drag any single per-step control — the value broadcasts to all 32 steps in real time.
9. Quick Reference
9.1 Default values
Parameter Default
RUN On
STEPS 8
DEF LEN 1/8
SYNC On (Host sync)
RESTART Off
BPM 120
ORDER Up
MIDI CH Input
ROOT C
TRANSPOSE 0
SWING 50
PAGE FOLLOW Off
Step Active On
Step Velocity 100
Step Pitch +/-st 0
Step Length Def
Step Gate % 75
Step Octave rnd Off
Step Note src Held
Step Chord Major
Step Harmony Off
9.2 Window size limits
Minimum 1400 × 750 pixels. Maximum 1800 × 900 pixels. Drag the host's window edge to resize within that range.
9.3 Engine notes
Pattern timing is sample-accurate at 44.1 kHz, 48 kHz, and 96 kHz.
At 96 kHz with very small audio buffer sizes, the host audio thread can stall — recommend buffer sizes of 1024 samples or larger at high sample rates.
Held-notes set has a hard cap of 32 simultaneous notes. Notes beyond the cap are silently dropped from the held set; existing held notes continue normally.
Arpeggiator MK1 turns held chords into rhythmic patterns of single notes, chords, or harmonised arpeggios. Configure up to 32 steps with per-step velocity, pitch, gate, and chord shape. Host-sync or internal BPM, multi-step editing, and a built-in latch keyboard. Drop it on a MIDI track and play.